Get Started With 3CX
Your Quick Reference Guide
Your Communications Dashboard – The 3CX Web Client
Logging in
In your Welcome Email you’ll find your credentials and a link to the web client. If you’ve lost your Welcome Email, not to worry. You can have it resent via the smartphone app (iOS, Android), or from the desktop client.
- Retrieve your credentials from your Welcome Email.
- Go to your Web Client URL, e.g. https://mycompany.3cx.com/webclient/
- Login using your extension and password.
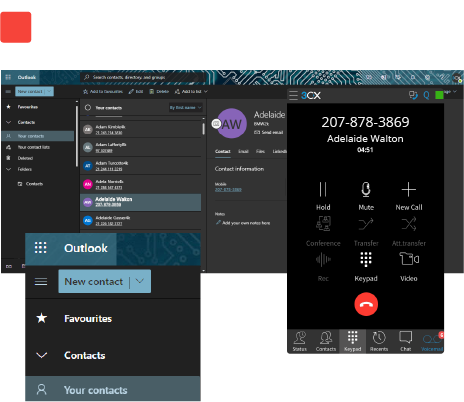
Make, Receive & Transfer Calls
The 3CX Web Client is easy to use and combines all the features you need to efficiently communicate, collaborate and connect with colleagues, partners and customers, straight from your browser.
The Web Client at a Glance From this one interface, you can easily make calls, view the status of colleagues, send chat messages, and hold a video conference. Here’s a quick look at the great things you can do with the 3CX Web Client. Let’s get started: Logging on In your Welcome Email you’ll find your credentials and a link to the web client. If you’ve lost your Welcome Email, not to worry. You can have it resent via the smartphone app (iOS, Android), or from the desktop client.The 3CX Web Client Google Extension
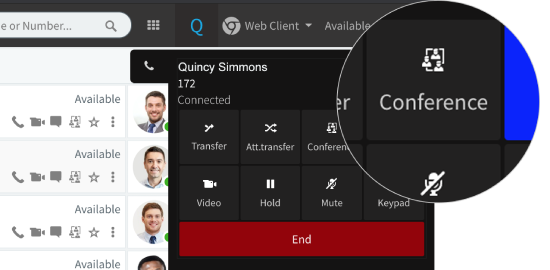
Placing a call
- “Transfer” will transfer the call without the need for you to speak to the receiver, a “Blind Transfer”.
- “Att.transfer” will transfer the call after you first speak to the receiver to see if they accept the call, an “Attended Transfer”
- “Conference” allows you to create an ad hoc conference call, adding more participants to join the conversation.
Customised Experience: IP Phone, Smartphone or Web Client
- Click on the phone selector and choose your device, e.g. your smartphone.
- Place your call as normal - a call notification will appear from “Make Call”.
- Click “Answer” to call the contact.
Manage your Status
Choose from Available, Away, Do Not Disturb, Lunch, Business Trip, and Set Status Temporarily.
Further, Customise your status in “Settings > Call Forwarding”. Here you can:
- Set a custom message
- Rename “Lunch” and “Business Trip” profiles
- Click “Answer” to call the contact.
- Set the number of seconds to activate forwarding of unanswered calls for “Available” and “Lunch” profiles
- Override forwarding rules based on Caller ID and time of the call
Professional Call Management with the 3CX Switchboard
For job roles where advanced call management is a daily task, the 3CX Switchboard is a powerful and user-friendly tool that offers a concise yet comprehensive view on call and queue activity.
There are various Switchboard views to choose from depending on your job role, which allows for quick and efficient call answering and transfers, monitoring, queue statistics and more. Choose from:
- “All” - extension and queue calls
- “Queue Calls” - Queue call activity
- “Wallboard” - Call queue analytics
- “Per Queue” - calls and agents for each queue
- “Reminders” - View and manage all set “Reminders”
Your Office Anywhere – The 3CX Apps
3CX on iOS or Android
- Get the app from the Google Play or Apple App Store.
- Open the “Your User Account on your New 3CX System” email and login to your Web Client.
- Click on your avatar in the top right and click “Scan QR Code”.
- In the app, scan the QR. Your extension will be set up automatically.
- Learn more about 3CX Android app and iOS app.


Work Remotely with the 3CX Android App
The 3CX smartphone app for Android allows you to seamlessly take your office communications with you wherever you go. Access the company phonebook, make calls, send chat messages and more from the palm of your hand. There’s no need to use your personal mobile plan for business calls anymore.
Setting up your Extension
- Allow 3CX to access the camera so you can provision your extension via QR code.
- Scan the QR from your Welcome Email and continue to make a test call to the “Echo service” so that you can grant the app the required permissions.
- Give authorization, make the call and you’re all set!
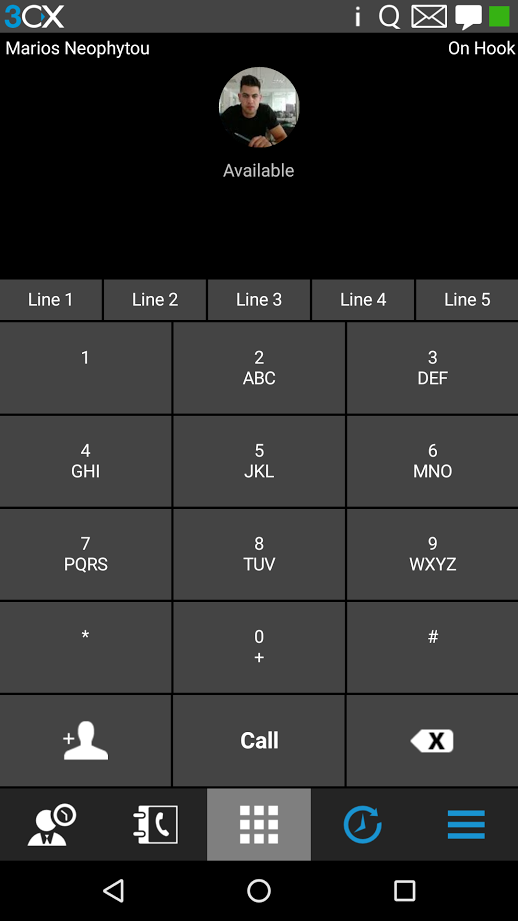
Placing a Call with the 3CX Android App
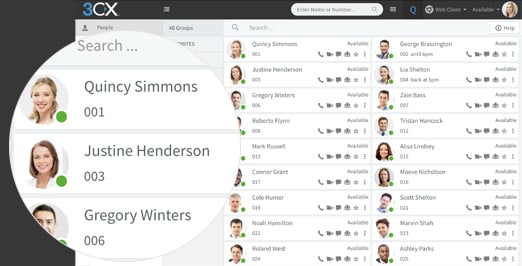
Making a call with the Android app is quick and easy. In “Contacts” search by name, number or email address, click the phone icon next to the contact and hey presto. You’re now using your office phone system from your smartphone.
Once you’re in a call, you can seamlessly perform a number of actions, including:
- “Transfer” will give you the option to “Blind Transfer” without the need for you to speak to the receiver, or “Attended Transfer” will transfer the call after you first speak to the receiver to see if they accept the call.
- “Conference” allows you to create an ad hoc conference call, adding more participants to join the conversation.
- “Video” add video to your call for face to face communication.
Effortlessly Schedule a Conference Call
Press the menu icon to open the sidebar menu and find the Conference option. Here you can easily schedule a conference call and invite participants from your contacts or by email.
Set your Status and Avoid Distractions
Using the Status feature will let your colleagues know if it’s OK to call you, saving you from being distracted and them from wasting time.
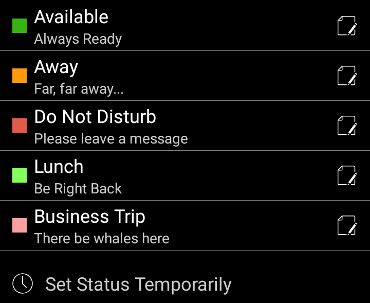
Choose from:
- Available
- Away
- Do Not Disturb
- Lunch
- Business Trip
- Set Status Temporarily
You can further Customise your status and call forwarding rules by entering the status profile menu.
Customise your 3CX App
Personalize your app experience to suit your preferences in the Advanced Settings, which offer a number of options including Car/Bluetooth Support, Silence Detection, Battery Optimization and Ringtone customization.
To access Settings, simply press the menu icon at the top. From here you can also:
- Add, edit and switch between accounts
- Choose your theme
- Configure audio options
- Request a new Welcome Email.
.png?tr=w-370,h-307)
Your office, anywhere with the 3CX iOS App
Work remotely from your home, by the pool or at your friendly neighborhood cafe; the 3CX app for iOS let’s you take your office extension along for the ride no matter the destination! Access your company phonebook, make and receive calls, chat with colleagues, attend to customers with website live chat and hold a video conference from the palm of your hand.
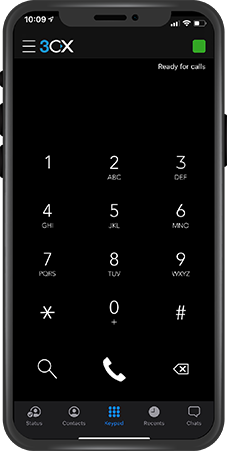
How to set up your extension in the 3CX app for iOS
Note: Your company PBX must be running 3CX V16 Update 5 or above to use the 3CX iOS app, which uses the latest Apple technology for a more reliable experience. Check with your administrator if you are not sure of the version you are using.
- Open the app, read and accept the license agreement and authorize the various permissions the app needs (camera, microphone).
- Scan the QR code from your Welcome Email or the Web Client to automatically configure your extension. You’re now “Ready for calls”.
How to locate your 3CX QR code
There are two ways to find your unique QR code:
- In your Welcome Email as an attachment. If you can’t locate yours, with the subject “Welcome to 3CX!”, ask your administrator to resend it.
- In your Web Client go to “Settings > Scan QR Code”.
And that’s it! Let’s get started.
Making a call on your iOS device
Using the iOS app to make a call is as straightforward as making a call from your smartphone’s native call function. Simply enter a number via the dialpad and press call, or view contacts and search by name, extension number or email address. Press on the contact to enter the contact menu and select “Call”. Congrats! You just made your first call with the 3CX iOS app.
You can easily perform a number of actions on an active call including:
- “Transfer” will allow you to perform two types of transfers.
- “Blind Transfer” - transfer the call directly without addressing the receiver.
- “Att. Transfer” - transfer the call after first speaking to the receiver.
- “Conference” allows you to add more participants to the call.
- “Rec” enables you to record the conversation.
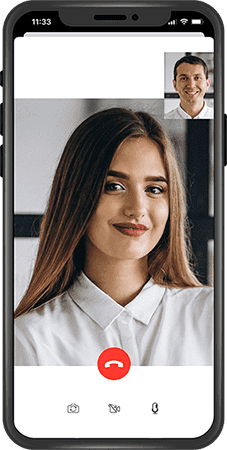
- “Video” let’s you take your call up a notch by adding video to the mix.
- “New Call” places the current call on hold to make a new one.
Schedule a conference call in moments
Press the menu icon and select the Conference option. Here you can view scheduled conferences or create a new one and invite participants from your contacts or by email.
Create video meetings on the go
With integrated video calling, you can join meetings from wherever you are with your smartphone device. Simply press the video button to add it to a call or, for a scheduled video conference, go to “Settings > Conference”, select the meeting and press join.
Share your availability with Status
The status feature is a great way to inform your colleagues whether or not it’s OK to call you. Not only does this enable you to create a distraction free zone, it also helps your colleagues to handle calls more efficiently.
Choose from:
- Available
- Away
- Do Not Disturb
- Business Trip
- Set Status Temporarily
You can Customise your status and configure forwarding rules by pressing on the arrow next to the status.
.png?tr=w-236,h=426)
3CX iOS app settings
.png?tr=w-750,h-969)
From the Settings menu you can easily switch between accounts and view their details as well as add a new extension.
Access Settings by pressing the menu icon at the top. From here you can also:
- Create a conference.
- View and manage voicemails.
- View audio and troubleshooting settings.
- Scan a QR code.
Using your Deskphone with 3CX
For the many people, there’s nothing like the feel and functionality of a physical phone. That’s why 3CX supports a number of IP Phone models. Below is a list of guides that will help you setup a conference, transfer a call, check your voicemail and make a call from your deskphone.
Remember! Using the web client for these functions is much easier, and a wide range of our supported devices seamlessly work with the web client so you can control your deskphone with a few simple clicks. You can make and receive calls, chat with colleagues, organize audio and video conferences, check status, access voicemail and more.
Making Calls from Your IP Phone
Transferring Calls from Your IP Phone
Checking Voicemail from Your IP Phone
- Snom M65
- Yealink CP920 Conference Phone
- Yealink CP960 Conference Phon
- T4x
- Yealink T48
- Yealink T53 & T54
To check your voicemail from your mobile phone or any external phone when you have no WiFi or 3G connection:
- Pick up your phone and dial the number your administrator provided you with.
- Once connected wait until you hear the prompt “Please enter extension number”, type in your extension number.
- You will be asked for your extension’s PIN number. Type your voicemail PIN number then press ”#”.
- You will be given access to your voicemail. Follow the voice prompts to check, delete or listen to your voicemails.
Voicemail
Set your voicemail greeting via Web Client:
- Go to “Settings > Greetings”.
- Record a new greeting, upload pre-recorded messages, and change greetings for individual statuses.
Set your voicemail greeting via Deskphone:
- Dial the voicemail number listed in your user account email.
- Enter your PIN and then press “#”.
- Select option “9” then “8” and then “0” to record.
- Press “#” to end the recording and “0” to save.
Listen to your voicemail messages:
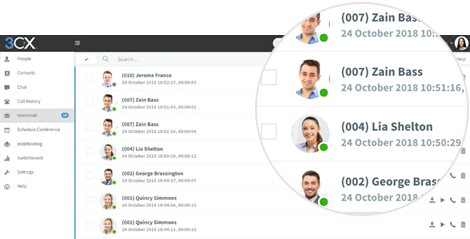
- From your App, open the menu and tap on “Voicemail”.
- In the Web Client, go to “Voicemail” and click the play icon.
- From your deskphone dial your voicemail number or hit “Voicemail/Message”, enter your PIN, press “#” and then “*” to play your messages.
Web / Audio Conferencing
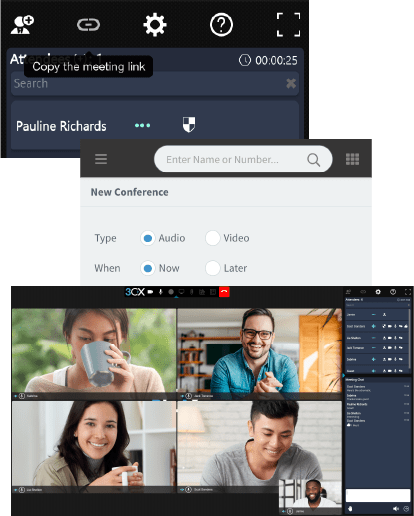
Create an ad-hoc conference:
- Open the Web Client and click on “WebMeeting”.
- Allow WebMeeting to access your camera and microphone and click “Join Now”.
- Click on the participants button to invite by email or get your shareable meeting room link.
Schedule a Conference:
- Open the Web Client and click “Schedule Conference”.
- Select the type of conference; “Audio” or “Video”, then select “Later” and enter the date and time of the conference.
- Fill in the details, select your calendar and click “Create Meeting”. Learn more.
Turn any call into a conference:
- During the call, select “Conference” in the Web Client call pop up, browser extension or app call screen.
- Search by name or extension, or add a phone number.
- Select your participant/s and they will be automatically dialed.
3CX Video Conferencing
- How to schedule an audio or video conference
- Schedule an audio conference from the Android or iOS app
- Elevate a current call to a conference/ad hoc audio conference
- Your personalized Click2Meet URL
- Troubleshooting
3CX includes a powerful video conferencing feature that allows for effective, face to face communication and collaboration with colleagues and customers no matter where they are. With 3CX, your invitees can seamlessly join meetings with absolutely no login or sign up. All they need is your meeting link, Chrome or Firefox to join in-browser, or one of the free apps for Android or iOS.
How to schedule an audio or video conference
Creating a new audio or video conference is simple and takes just seconds. To get started, go to ![]() “Schedule Conference/Conference” in the web client or app then:
“Schedule Conference/Conference” in the web client or app then:
- Fill in the conference details.
- In the drop-down “Select Email / Calendar to add to”, select “Google”, “Microsoft 365”, “Outlook Online” or “Desktop Outlook (.ics)”.
- Click “Create Meeting” or “Schedule” and a new tab will open in which you can create the calendar event for your meeting and invite participants.
- If you are using desktop Outlook, an .ics file will download. Open the file and a pre-filled calendar entry will open on your desktop.
- Click “Invite Attendees” to add your participants.
- Click “Save” or “Send” to schedule your meeting and invite participants.
Please note: selecting “Email (Legacy, NO RSVP)” will send a bare bones email invitation in which the RSVP function does not work. For this reason, we highly recommend you choose one of the other options - Google, Microsoft 365, Outlook online or desktop.
Schedule an audio conference from the Android or iOS app
Quickly schedule audio conferences from the palm of your hand with the Android and iOS apps. To create a new conference:
- Tap on the menu app menu
.png) button in the top left corner.
button in the top left corner. - Select “Conference” then “New”.
- Add your Subject, Notes and choose a date and time to schedule your conference.
- Add participants by selecting existing contacts or enter their phone or email address.
- Tap “Done”.
You can manage your conferences from the “Conference” section in the app, or from the Web Client in “Schedule Conference”.
Elevate a current call to a conference/ad hoc audio conference
To elevate a call to a conference:
- Click the “Conference” button in the dialer pop-up in the Web Client or in the browser extension.
- Search for who you want to add to the call by name or extension, or enter their phone number.
- Press enter and that’s it! They will be automatically dialed.
You can manage your conferences from the “Conference” section in the app, or from the Web Client in “Schedule Conference”.
Your personalized Click2Meet URL
Click2Meet is a unique URL that you can share with customers, partners or colleagues, just like your office phone number, for an easy and free way to contact you. Your shareable Click2Meet URL can be found in your Welcome Email.
When someone requests a WebMeeting via your unique URL, you will be notified by email or chat. All you need to do is click on the URL sent to you to accept the request and enter the meeting.
Note: Your administrator must set the “Notify me” option for your extension or queue for Click2Meet meeting requests to be delivered.
Troubleshooting
In the unusual event that your video is not working when joining a 3CX WebMeeting, please follow these steps:
- If the “Could not detect your Webcam” message is displayed, your video device is not connected or not working. Try reconnecting your webcam, or using a different device.
- Check if you can see your preview image at the bottom right of the screen. If a red camera icon appears beside your name in the Attendees list, this indicates that there is an issue with your webcam.
- Check if another application is using your webcam by closing all video-related applications, then join the meeting again. This is the most common reason for encountering video issues.
- Check if your browser is blocking the webcam:
- For Chrome check in “Settings > Advanced Settings > Site settings > Camera permissions...”.
- For Firefox check in “Preferences > Privacy & Security > Camera Settings…”.
Using 3CX with Microsoft 365
Update your Status:
- In Office 365, go to your calendar and add your meeting.
- When your event begins, your 3CX Status will automatically update to “Do Not Disturb” and will change back to “Available” when the event is over.
Launch calls from the Microsoft 365 interface:
- Ensure you have the 3CX Extension installed.
- Click on any phone number in Office 365, the Web Client Extension window will appear with the number pre-filled.
- Click the call button and your call will be launched.
Create new contacts:
- In the web client, go to “Contacts > Personal” to add a new contact, or add your contact in Microsoft 365.
- Once your contact is created, 3CX will sync with Microsoft 365 to update contacts across both platforms.